2024 best Google Adsense tutorial, we build our own website, or niche website, and then make money through Google Adsense is the easiest way to make money online in the world, because all you have to do is build a website, and then you only need to provide your readers with quality content or content they are interested in.
- 1 What is Google AdSense?
- 2 Benefits of AdSense
- 3 Best Google Adsense Tutorial
- 4 Waiting for Adsense approval
- 5 How to add Adsense Code to your WordPress website?
- 6 How long does it take to earn the first $100 from AdSense?
- 7 AdSense Best Practices – Google Adsense Tutorial
What is Google AdSense?
Google AdSense is a program run by Google through which website publishers in the Google Network of content sites serve text, images, video, or interactive media advertisements that are targeted to the site content and audience. These advertisements are administered, sorted, and maintained by Google. Wikipedia
Google will automatically use its algorithms and match your website content to show your visitors the most relevant ads. For example, if your website is about pantyhose, it will show you pantyhose content, and your website is about Domains. The content of domain ads may be displayed, etc.
Then, how can you get the income? Well, it runs on a CPC (cost per click) system – every time someone clicks on the ads, you will get a certain amount of money. The value is determined by factors such as keyword bids and quality scores.
Future read:
How to use Jaaxy find the Best niche domain name
Benefits of AdSense
Making money online through adsense is the easiest way, so let’s take a look at the benefits of adsense.
- Easy to use – You only need to deploy a piece of code or install the Site Kit plugin on your WordPress site.
- Flexible ad formats – 5 types of ad units (Display ad, In-feed ads, In-article ads, Matched content, Search engine), In addition, ads can be processed automatically by Google.
- Add multiple sites – you can set it on more than one website. The only requirement is that your sites should be in line with AdSense terms and policies.
- Seamless support – the help center and AdSense community are ready to solve your problems. Moreover, you can find plenty of tutorials to help you learn more about AdSense.
- Prompt payment – it has a monthly payment cycle, making sure that you’ll get your money on time.
Now that you know the benefits of using AdSense, we will start the Google Adsense Tutorial of this article.
Best Google Adsense Tutorial
How does Google Adsense work?
How does Google earn from AdSense?
Where can I see the ad on the page?
Apply for your Google AdSense Account.
How to add Adsense Code to your WordPress website?
How does Google Adsense work?
Google Adsense belongs to the Google product family. There are three ways to make money through Adsense. They are:
- Build your own website
- YouTube channel owner
- Use the third-party platform blogger to create your own blog.
Now we use some website examples to illustrate how to make money through Adsense.
Suppose you have a lamps blog site and you have decided to monetize it. So, to earn money through Google AdSense, you would have to apply for Google AdSense and have to wait for approval. When your AdSense account is approved, then Google would start showing ads to your site and when any visitor visits your lamps site, and if they click any ads, then Google will paying you per click.
In this way, you can earn money through Google’s AdSense.
How does Google earn from AdSense?
Google acts as a mediator between advertisers and publishers. It charges money from the advertiser through the Google Adwords program and then displays their ad on the blogs and YouTube videos according to their business or niche. On the other hand, if any visitors click on the active ad, it pays some part (68%) of the money, charges from advertisers to the publishers, and keeps the rest of the parts (32%).
Where can I see the ad on the page?
After your AdSense account is approved, and you have correctly deployed the ads code (or installed the Site Kit plugin), you can see google ads on your web page (remember, you cannot click by yourself).
Google ads in post header
Ads can be displayed in any position, you can control it manually or let Google automatically control it.

This is the ads displayed in the article, and the ads is also displayed in the sidebar of the website.
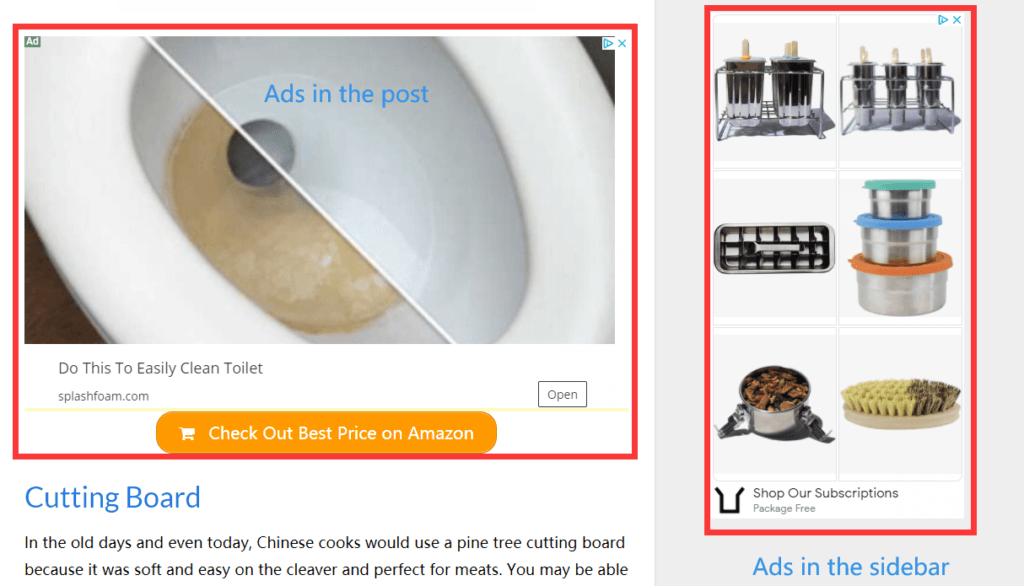
From the above ads it can be concluded that this ad is relevant to our web content.
Apply for Your Google AdSense Account
It is important to first make sure that you have some content already on your website before applying for Google AdSense. At this point you should have your ‘About me’ page, ‘Privacy Policy’ page, and a few posts on your site.
Once Google reviews your site and deems your site as useful then you should receive an email indicating that your site has been approved*.
*Keep in mind this process can take up to a few days so keep posting new content as you normally would in the meantime.
Let us start creating Google AdSense account step by step.
First of all, go to the Google website and type the keyword Google AdSense and hit the enter key and click the link or click the link https://www.google.com/adsense/start/ and it would redirect you to a Google AdSense “Get Started” page.
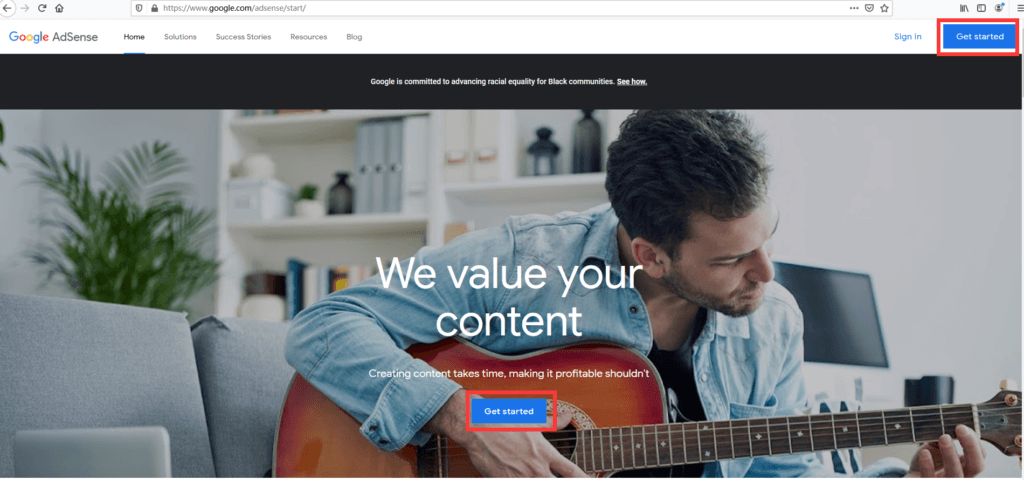
Secondly, click the Get Started button, then you will come to a new page, as shown in the figure below, fill in your website information and your email, preferably using Gmail. If you don’t have a Gmail account, you can register one first.

After filling in the URL of your site and email address, you can click the Save and continue button to proceed to the next step. For Get Helpful Adsense info at that email address, you can choose Yes or No.
Thirdly, click the button “Save and Continue”. After that, you would be logged in to AdSense through your Gmail. If you have used the wrong Gmail then also you have an option to change and modify it. In addition to this before clicking “CREATE ACCOUNT” recheck all the information which you have filled within the form.
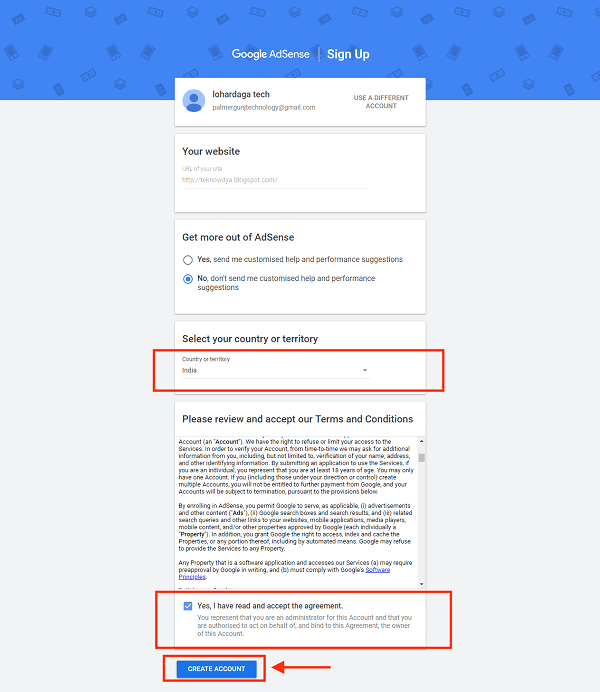
If everything is fine, select your territory or country and accept the “Terms & conditions” button by putting a tick mark on the radio button “Yes, I read and accept the agreement”.
Finally, after the third step, your Google AdSense account would be created automatically for that particular Gmail and website.
AdSense Account Type
After completing the previous step, you will be taken to the current page, allowing you to select the type of AdSense account and fill in the relevant information. There are two types of AdSense accounts, individual and business. Generally speaking, we choose individual. Of course, if you have a company, you can choose a business. The difference between them may be the tax paid.
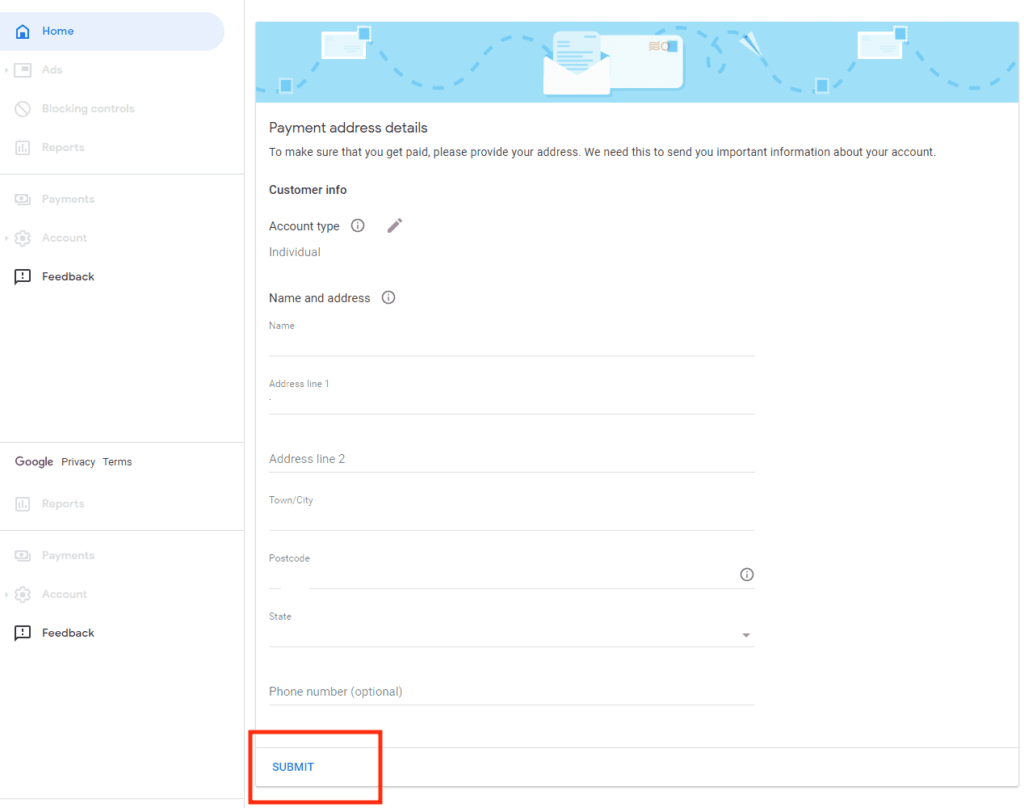
Verify Your Phone Number
Verifying the phone number is an optional step. If your registered Gmail is associated with a phone number, you do not need to verify it when you register for Adsense. If you are registering a new Adsense account, you need to verify your phone number.
Connect Your Website To Google AdSense
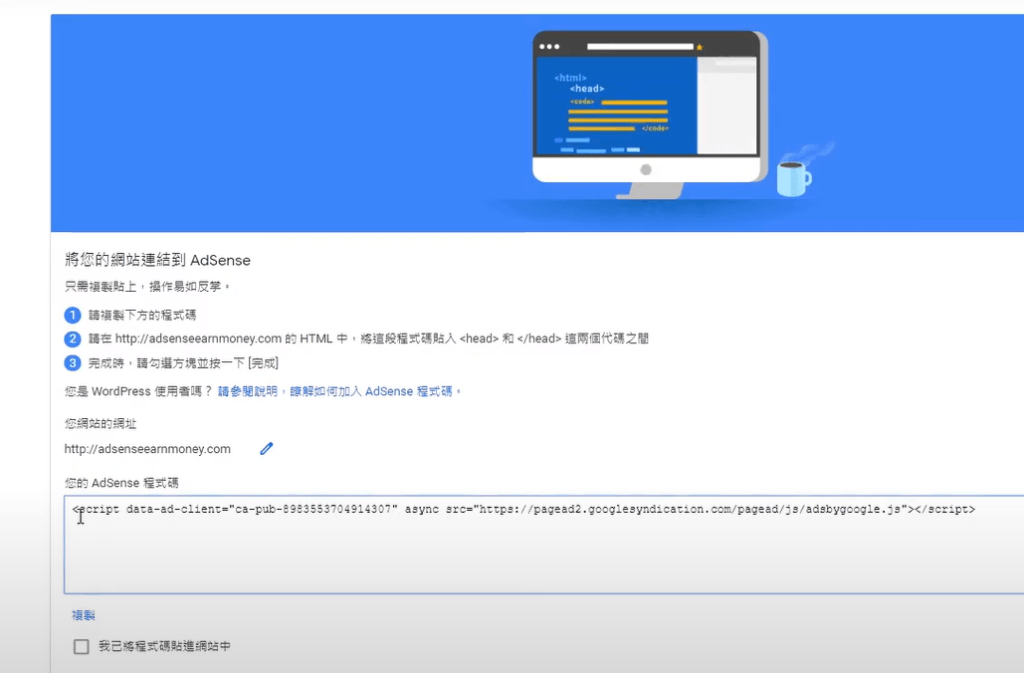
In the last step, you will see a page as shown in the figure below. Google will tell you to deploy a piece of code to your website.
Waiting for Adsense approval
When you have correctly deployed the Adsense code on your website, you will have to wait for Google Adsense to verify it. Usually, it takes less than a day for Adsense to approve your website, but sometimes it may take longer.
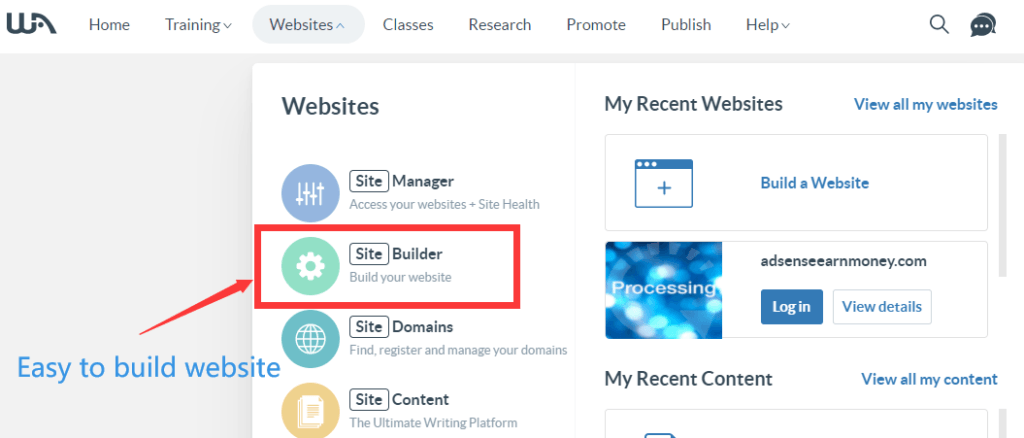
If your website is built using WordPress, or you join Wealthy Affiliate and create it using Site Builder, then you can easily deploy Adsense code.
Let us check how you would add code in a WordPress Website.
How to add Adsense Code to your WordPress website?
In the following steps, you will learn how to add AdSense code to your WordPress website. Let’s take an in-depth look!
To make it easier to add code to the header of your WordPress website, you can install the Insert Headers and Footers plugin to complete the function of adding Adsense code to WordPress. Compared with editing the header.php file of the theme directly, With the help of a plugin to complete the work, you don’t need to worry about your code loss after the theme update.
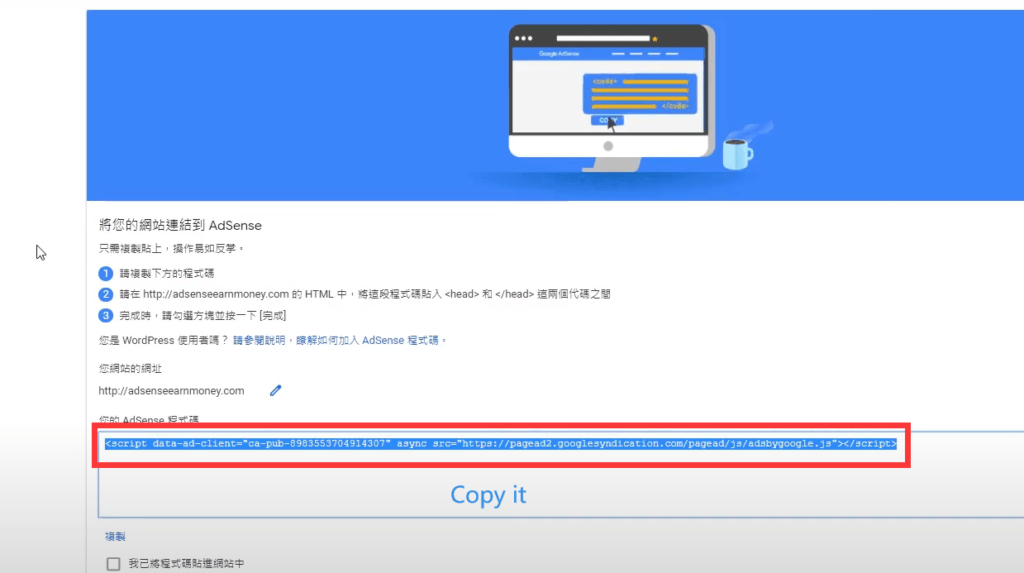
As you can see in the picture above, select the red part of the code and copy it, then use the administrator account to enter WordPress, click Setting->Insert Headers and Footers, paste the code into the Scripts in Header area, and finally remember to save it.

Tips: You can also edit header.php to add adsense code.
Click Appearance -> Theme Editor, then choose Theme Header in the Theme Files section.
Insert the code just above the </head> tag.
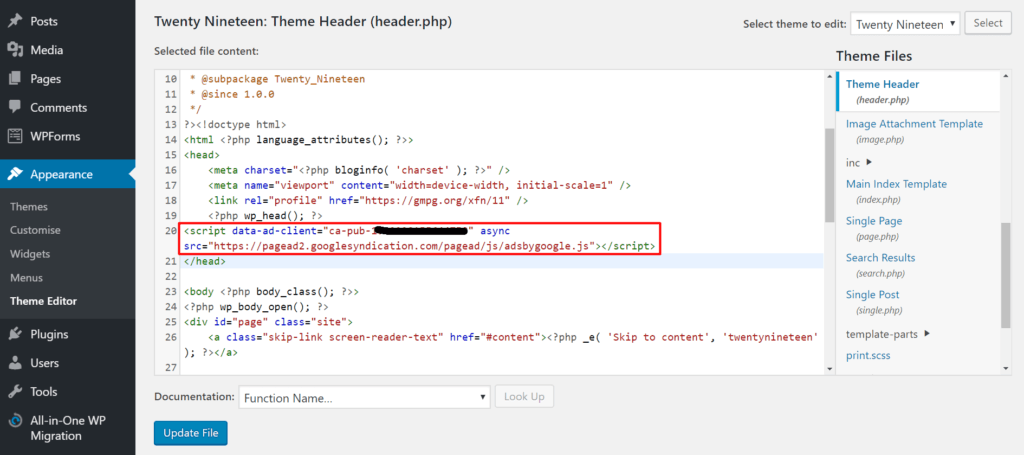
Finally, remember to click Update File to save.
Go back to the AdSense page, tick the I’ve pasted the code into my site checkbox, and press Done.
A dialog box will pop up to tell you that your account approval is in progress. Click Got it.

Step 2. Insert Ad Unit
When your Adsense account is approved, you will receive an email and you can start creating ad units.
Access the Adsense dashboard and click Ads in the left sidebar.
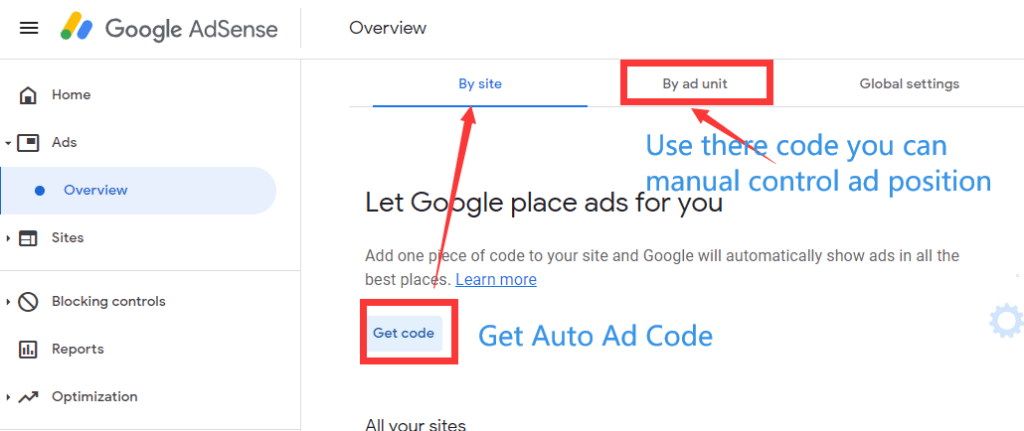
You will see the same page as the above image. There are 3 tabs here, they are: By site, By ad unit, Global setting, usually, we only need to pay attention to the first 2 tabs.
When the Bye site is selected, when you click Get Code, a page will pop up to display the ad code snippet, you only need to copy it, and then put the code in the section (Insert Headers and Footers »Settings ). In fact, this method is to deploy the auto ad code. Google will auto show matching advertisements on your network based on the content.
how to manually control the ad show position?
Under normal circumstances, we do not need to manually control, Adsense automatic advertising will work very well, it will display ads in the appropriate location, but if you want to manually control the advertising display location, you only need to create an ad unit.
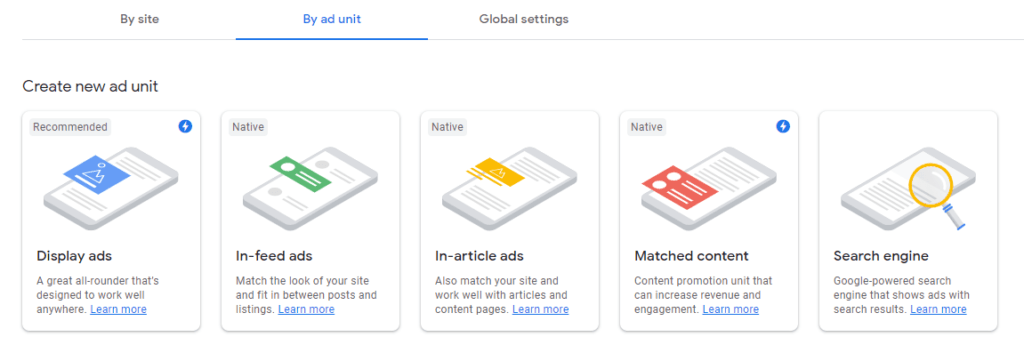
How to create an ad unit and deploy the code to the website, you can read how to control Adsense ad place manually?
Next, let’s look at the Google Adsense Tutorial on mobile devices.
Use advanced responsive ad units for mobile
The best performing ad units for mobile are 300×250 ads. By adding a piece of CSS code to your ad units, you force the size to 300×250 on resolutions below 400px and thus you increase your earnings. so while the best practice is to use responsive AdSense ads for both desktop and mobile. When you use responsive ads, AdSense will try and show the best size ads in the available space.
Tips: WordPress can install AMP plugins to make it more mobile-friendly, and it can also add ad units to display ads on AMP pages.
Top of page Show ads
When users visit your mobile website, you need to show them ads when they start interacting with your page, because this will greatly increase your CTR and revenue.
Tips: You will get benefits by following the advice of Google Adsense Tutorial.
Let Google optimize the size of your mobile ads
This operation is very simple, you only need to enable it in the adsense background.
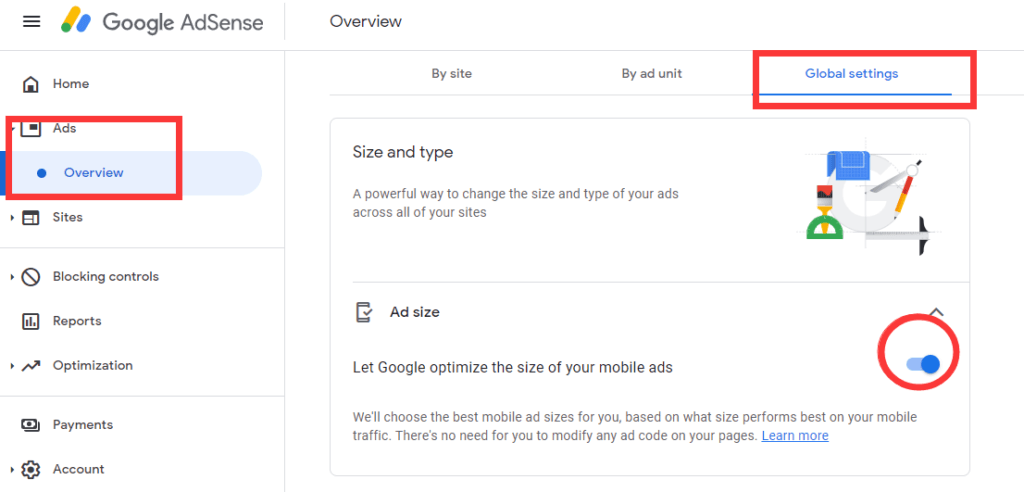
Use auto ads
Google Adsense Auto Ads is determined by Google because it will optimize by itself. But you can enable automatic ads and ad units at the same time (manual control).
Step 3. Make your website faster
The faster the website speed, it means that more pages are displayed to your visitors at the same time, and there may be a higher click-through rate, so your income will be more and more. This is also promoted by Google Adsense Tutorial.
This is a fact for the desktop version of your website but more importantly for mobile.
In order to earn more income online, you need a fast website. Solving the problem of speed is a difficult task. but this is not the content of the Google Adsense Tutorial.
However, the Google Adsense tutorial provides some pointers to consider related to page speed:
- Go to the Google Page Speed Tool and get a report for your website. This will give you a very good idea of your current page speed score and what you need to do to improve it.
- Evaluate the performance of your server (with the help of the hosting provider) and get more resources if needed.
- Optimize your images before uploading
- Minimize the use of images within your content (especially for mobile)
- Reduce the number of active plugins
- Upgrade WordPress and plugins to the latest versions
- Use compression and caching
- If you have a lot of media elements (images, videos), consider using a Content Delivery Network (CDN)
- Add AMP support. This will improve your page load time on mobile since pages are cached by Google.
- Use asynchronous ad code when generating your AdSense Units
Step 4. Test Ad revenue and CTR of different ad Place
If you want to increase revenue, then we have to understand which of the ads on our website are most liked by visitors. it is necessary to keep experimenting and testing different ad placements until you find what combination works best for your website and audience.
The more effective method for me or others may not be the best solution for you.
Please note that I am using the term ad unit combination. Below I will explain why it is necessary to find the best ad combination to use when testing, rather than just focusing on the performance of the ad unit.
Google Adsense Tutorial Tips: Larger ad units can attract more ad clicks, but they do not necessarily increase revenue per click.
Ad units with higher content (above the fold) can generate higher revenue per click, even if these ads are smaller in size.
Google Adsense Tutorial Tips: you can place a 300×600 ad unit in the sidebar, but the revenue per click may be lower than the 300×250 under the post or in the content.
Don’t forget, when a visitor clicks on an ad, it will leave your website and visit the advertiser’s website.
This means that they have left your site without the opportunity to view ads that might bring you more revenue.
So, what you need to do is following: – Google Adsense Tutorial
First place your ad unit in the most obvious location. For example, on the post page (desktop), you can place an ad unit under the headline, an ad unit under the first paragraph, and an ad unit in the sidebar.
Let the ads run for a few weeks. If the traffic is low, you can let them run longer in order to obtain reliable statistics so that decisions can be made.
Go to your AdSense account and view the “Performance Report”, especially the “Ad Units” report. This report shows the number of views, clicks and revenue for each of your ad units.
Take note of the CTR of each unit, earnings per unit, and total earnings.
Next, change the position of some ads. For example, you can keep the top banner ad and in-content ad, but delete the sidebar ad and add a new ad unit at the end of the post.
Please keep this setting for a few weeks, then check your AdSense report.
Continue the above test until you find the best combination of ad units and placements that generate the highest revenue.
Best AdSense Place for Desktop & Mobile
Google Adsense Tutorial: I have conducted the above experiment several times and found that the ad unit placed in the main content performs better than the ad in the headline or sidebar.
Desktop websites are the following combination of One responsive Ad unit below the 2nd paragraph. One responsive Ad unit below the 6th paragraph. One responsive Ad unit below the post content (above the comments).
Google Adsense Tutorial: For mobile, I use the same responsive ad units within the content.
How long does it take to earn the first $100 from AdSense?
After your adsense account is approved, you can start making money online, but it doesn’t mean that the content of your website does not need to be updated from now on. On the contrary, you need to keep updating the content of the website to get more traffic, so that you can earn Get more passive income.
We all know that when your Adsense income reaches $10, the PIN will be verified, and after reaching $100, Google will pay you your income.
When I joined a wealthy affiliate 3 years ago, I established the first niche website and applied for an Adsense account. It took 1 month to reach an income of 10 dollars, and 3 months to reach an income of 100 dollars. Why am I Making money online so slow? That’s because I don’t update the website often.
Google Adsense Tutorial: If you update the website frequently, I believe you will earn the first $100 faster.
Don’t get discouraged.
Some tips
- Don’t show too many ads
- If you decide to use AdSense, stick with AdSense
- Keep the page simple, GeneratePress theme can help you.
- Keep your visitors and let them come back again
- Read and adhere to ALL AdSense guidelines

AdSense Best Practices – Google Adsense Tutorial
Google Adsense Tutorial: Aside from what you’ve learned so far, here are a few best practices that can help you when using Google AdSense on your WordPress site:
Do’s
- Your website should follow the webmaster quality guidelines and AdSense program policies to get your site approved quickly.
- Use AdSense heatmaps, which will help you with ad placement.
- Look at the sizes of the top-performing ads. Choose the one that suits best with your website layout.
- Write engaging content that would attract users to your website. This will increase the chances of getting clicks on your ads.
- Conduct Google experiments to see which ad works.
- Make sure that both your website and the ads are responsive.
Don’ts
- Clutter your site with too many ads as this will bounce off the visitors.
- Click your own ads. Fraudulent clicks will get your account banned.
- Force users to click on your ads by using call-to-action texts like “Click on ads.”
- Place ads that do not yield better earnings. Track the ads’ performance regularly.
- Insert ads on empty pages.
- Bring automated traffic to your website to avoid account closure.
- Make multiple AdSense accounts with the same payee name.



一个网站现在不够用,站群才有钱