How to control Adsense ad place manually? By default, Google Adsense will automatically display the best matching advertising content on our website. As the name suggests, Auto ads place ads automatically on your site. Their position, number, and sizes are up to AdSense.
Of course, we can optimize and control the google adsense ad place, which allows Publishers to optimize their revenue. The following tutorial explains the process of creating an AdSense ad unit and placing it manually on your blog or niche website.
How To Control Adsense Ad Place Manually?
Before starting this tutorial, you’d better have an Approved Adsense Account. If you don’t understand how Adsense makes money online, you can read this Google Adsense tutorial. Of course, you can create one here.
This tutorial is based on a WordPress website. In order to manually control the ad position, you also need to install a plugin called Ad Inserter for your WordPress website before starting (I didn’t use pro, although pro is more powerful because the free version That’s good enough), because we will use it in the next content.
Create a new ad unit in Google AdSense
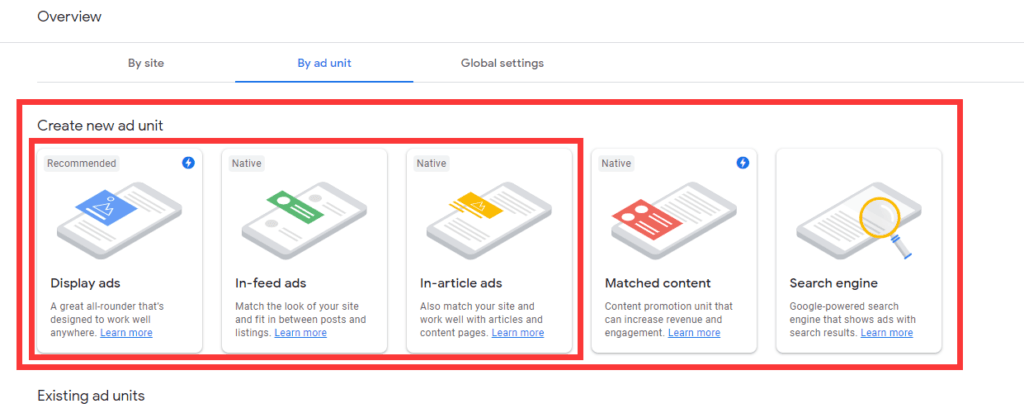
Access the Adsense dashboard and click on Ads -> Overview in the left sidebar. then click By ad unit, you will see an ad unit similar to the picture below.

They respectively mean that the types of ads you can create manually are: Display ads, In-feed ads, In-article ads, Matched content, Search engine. On the page, we only need to pay attention to the 3 types of ad units on the left (Display ads, In-feed ads, In-article ads). The Matched content type will only be available when you have enough articles on your website.
We will use Display ads here to introduce how to manually control the
show placement of ads on the page, Other ad unit types are similar operations, so you only need to understand one method, and you will learn the others. Our purpose of creating an ad unit is to get the ad unit code to deploy to the WordPress website.
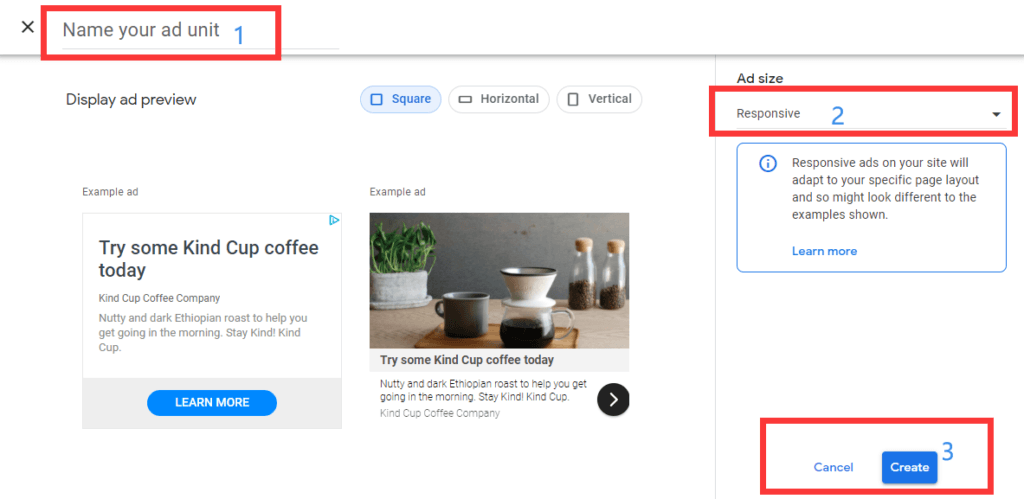
First Click Display ads. Open a new page, what you need to do here is naming your ad unit, then set the Ad size, and finally save it. It is recommended to set the Ad size in the second step in the figure below to keep the default. Of course, you can set the ad size to fixed.

Tips for naming your ad unit – Control Adsense Ad Place
I see different naming styles for ad units every day. While the exact format may vary, I find it most useful to have at least the following information in the name:
- the website, if you have more than one
- position on your site
- format (e.g., “Medium Rectangle”) or size (e.g., “300×250”)
- device (e.g., “mobile” or “desktop”)
A good name allows you to find an ad again quickly. An example could be
by3.org | below main menu | medium rectangle | mobile
More about ad units.
When you click save, you will get a snippet of the ad code, similar to the picture below. They are used for HTML and AMP pages respectively.

Deploy the ad unit code to the website
Before starting, you need to install the Ad Inserter plugin for your niche website or blog created with WordPress, so that we can better implement Control Adsense Ad Place Manually. If it is already installed, skip it.

After installing the Ad Inserter free version, you will get 16 ad blocks.

Step 1: Copy code snippet
First copy the ad unit code we created in adsense, as shown in the figure below.

Step 2: Paste code snippet to Ad Insert block
Log in to the WordPress navigation panel, click Setting-> Ad Inserter, Copy the ad unit code snippet and paste it into the unused block area, as shown in the figure below.

Follow the steps indicated in the image above, and finally save it.
Step 3: Check whether it works
Usually, after the deployment of the ad unit we created, it is recommended to finally check whether it is worked. You can open any article to see if there is an advertisement in the position you expect, such as the beginning of the article.

As you can see, it is already working.
Troubleshooting
New AdSense ad units might take up to 30 minutes to appear if your account is fully approved. With unapproved accounts, it might take 48 or even longer until the ad is showing up on your site.
Since 2019, AdSense can inject Auto ads on every website that contains any AdSense ad unit code. If unwanted Auto ads appear on a page with manually inserted AdSense ads, you can only disable them in your AdSense account. Find a short description of how to do this in our manual.
Still not seeing any ads? Switch the ad type in Advanced Ads to Dummy. If you see an ad output now, the problem is with AdSense and your account.
AdSense does not suggest a specific amount of ads on your WordPress site, but there shouldn’t be too many ads too close together. AdSense can also decline to show specific ads if there are too many of them placed already.
Conclusion
After you create an ad unit, but without the help of plugins, it is difficult to add the code to the specified location of the web page, which means that it is difficult for us to control the placement of the ad.
But the good news is that you can install ad plugins for the niche website created with WordPress, such as Ad Inserter. Through ad plugins, we can manually control the showplace of the ads.
In this post, we are using the Ad Inserter plugin. For a more detailed introduction, you can browse its official website for more information.
Then you now understand How to control Adsense ad place manually?


Hey there, You’ve done a great job. I’ll definitely
digg it and personally recommend to my friends. I’m sure they will be benefited from this website.
Hi there! Do you know if they make any plugins to help with SEO?
I’m trying to get my blog to rank for some targeted keywords
but I’m not seeing very good results. If you know of any please share.
Many thanks!
I really love your blog.. Pleasant colors & theme. Did you develop
this amazing site yourself? Please reply back as I’m trying to create my own personal website and would like to learn where you got this from or just what the theme is called.
Appreciate it!
you can find it on bottom. Built with GeneratePress • Hosted in Wealthy Affiliate